


Key Takeaways
- Starting a successful blog begins with choosing a niche you genuinely enjoy and can consistently create content around.
- Neil Patel emphasizes that passion and long-term interest matter because blogging requires ongoing effort, consistency, and curiosity to maintain momentum. Picking a focused niche is more effective than trying to appeal to everyone.
- Instead of broad topics like “travel” or “fitness,” narrowing your focus helps attract a more targeted audience and makes it easier to stand out in competitive spaces. High-quality content and consistency are both essential for blog growth.
- Successful blogs don’t rely on publishing occasionally — they consistently produce valuable, useful, and engaging content that solves reader problems and keeps audiences coming back. Writing for skimmers improves engagement and readability.
- Most readers scan content instead of reading every word, so strong headlines, subheadings, visuals, formatting, and concise writing help improve user experience and retention. Content promotion is just as important as content creation.
- Neil Patel recommends publishing content across multiple platforms, guest posting on larger websites, and actively distributing blog content to increase visibility and grow traffic faster. Monetization should be planned early instead of treated as an afterthought.
- Successful bloggers often combine multiple revenue streams such as affiliate marketing, ads, consulting, products, sponsorships, or email marketing to create sustainable income.
Anyone can start a blog that makes money. Seriously.
Some of you can even generate enough money from your blog to quit your job.
Don’t believe me?
My blog gets over 2,436,100 visitors annually and generates more than one million dollars in revenue.
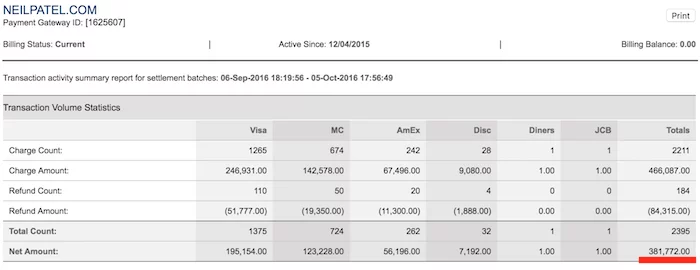
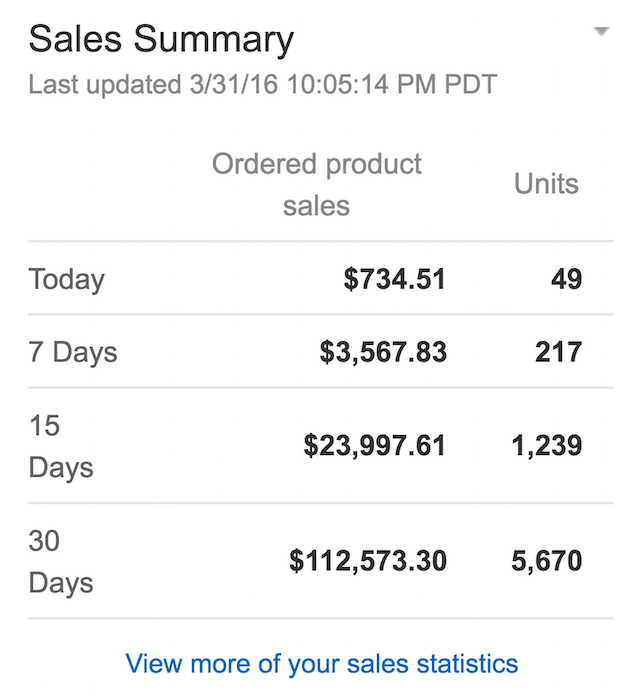
Above is an example of a 30-day earning period from a previous year. I earned over $381,000 in one month that year!
While you’re probably not going to reach that amount right now, I can teach you how to start a blog that makes over $3,000 per month.
I started from scratch just like you. But after more than a decade of trial and error, I’ve finally figured out the secret to running a successful blog that makes money.
You can avoid these mistakes and generate profits much quicker by following the blueprint outlined in this guide.
Your 2-Minute Quick Start Cheat Sheet
Looking for a barebones, quick start guide to get started as fast as possible? In this section, we won’t cover everything, only the essential steps. Everything is covered in way more detail later, so jump down if you hit a snag.
Before you begin, it’s important to understand the principles behind starting a blog.
- Pick a big enough niche. Make sure to pick a niche that is bigger than “vegan Caribbean recipes” but smaller than “nutrition.”
- Don’t stick with one platform. I know I’ve told you that you need to use WordPress as your blogging platform, but it shouldn’t stop there. Why not also use Medium, Tumblr, or even LinkedIn?
- Control your destiny. Post in multiple places and always link back to your site so you can better control traffic to your site.
- Blogging is both about “you” and “I.” People want to read stories. They want to be involved in a conversation, and the easiest way to do this is to use the words “you” and “I” within your blog posts.
- Always ask questions. At the end of every blog post, always ask a question. If you don’t ask a question, people won’t know what to do next.
- You have to stand out. You have to go above and beyond. Sadly, there is no single answer as every industry is different, but typically, infographics, visuals, and branching off from everyone else in your space will help you stand out.
- Your content needs to be portable and easy to digest. For example, creating video-based content or audio-based content (podcasts) are simple ways to make your content portable.
- Content isn’t king unless it’s good. Writing mediocre content isn’t good enough. It won’t do well, and you will just be wasting time. So, don’t write content unless it is really, really, really good.
- You have to produce quality and quantity. To increase your odds of success, you need to be willing to produce amazing content in quantity.
- Your blog isn’t always the best place to blog. From industry blogs to large sites like Entrepreneur and Business Insider, consider placing your best content on places with more visibility and higher domain authority, especially in the beginning.
- Useful content beats viral content. Instead of focusing on creating viral content (when you have less than a 1% chance of producing it), focus on creating useful content. Useful content tends to be evergreen, which means it can generate steady traffic over time.
- It’s easier to build a personal blog than a corporate one. People connect with people more than they connect with corporate brands.
- A blog won’t work without a community. Blogging is about creating conversations. But without readers and community, there is no conversation.
- No man is an island. Make sure you respond to each and every comment. Not just on your blog, but even when people comment on your social profiles, make sure you respond back.
- People don’t read; they skim, so write your content with that in mind. From leveraging headings to even writing a conclusion at the end of each post, this will help your readers get value out of your content even when they don’t fully read it.
- It’s all about the headline. 8 out of 10 people will read your headline, but only 2 out of 10 will click through and read the rest. So focus on creating amazing headlines, or else you won’t get tons of traffic.
- Reveal your cards, all of them. When making a point and having something to back it up, make sure you do it early on in each blog post. It is a great way to hook your readers and get them to read the rest of your content.
- Consistency will make or break you. Don’t start a blog unless you are willing to be consistent. Not just for a few months or a year, but I am talking years (3 plus).
- Don’t ever rely on 1 traffic channel. You need to have an omnichannel approach in which you are leveraging all of the feasible channels out there that work for your niche.
- Don’t forget about Google. You should always write for humans and not search engines. But that doesn’t mean you should ignore Google. Be sure to include keyword research from Ubersuggest and blend them into your content.
- Understand not all content is meant to last forever. As your blog gets older, your responsibilities will grow. One of them is the willingness to kill some of your content. Not all of your content will be relevant a year or two from now.
- You can’t set it and forget it. As your content gets outdated, you’ll want to keep it fresh, or people will find that it’s useless and bounce away.
- People won’t come back to your blog unless you ask them to. No matter how good your content is, people won’t just come back unless you ask them to. The easiest way to do this is through emails and push notifications.
- Don’t wait too long to monetize. If you go years before trying to monetize, people will assume everything on your blog is free.
- Have multiple monetization strategies. Not only is it a safer strategy to have multiple monetization methods, but you’ll also make more money.
- Be willing to pay the price. If you want to succeed, you have to be willing to put in the time and energy. And if you can’t, then you have to be willing to put in money. If you don’t. then you won’t do well, no matter how brilliant of a writer or marketer you are.
Now that you know the jist for starting a blog, it’s time to break it down into actionable steps so you can be on your way to making money.
Here are the next steps to take:
- Unleash Ideas Within You
- Choose a Name For Your New Blog
- Get Web Hosting From Bluehost
- Get Familiar With WordPress
- Install a WordPress Theme
- Customize Your Blog
- Brainstorm Blog Topics
- Write Your First Masterpiece
- Create an Editorial Calendar
- Monetize Your Blog
Step 1. Unleash Ideas Within You
Stop. Don’t get overwhelmed about this whole thing. Just breathe. You got this. You don’t need to reinvent blogging to be successful.
You just need to be specific about what you want to talk about.
The best way to do that is to get inspired by someone you admire in the same niche or industry. Do they have a blog?
If yes, read it. Then begin to let your ideas form. If you have no one specific, find someone you admire. Then let the ideas form.
Take your unique experiences and speak about them in your voice. Use your vocabulary and personality, and don’t think about it too much. Let it flow.
Your tribe will follow if you stay consistent.
When it comes to choosing your blog’s niche, there are two key questions to ask yourself.
1. Do I Enjoy Learning About This Topic?
If you don’t love the topic, it’ll show in your writing. You shouldn’t even start a blog if you don’t love what you’re blogging about.
Whatever topic you pick, you need to love it and be naturally curious about it.
If not, you’ll run out of ideas quickly. You’ll lose any momentum you built up at the start.
Most importantly, you won’t be able to consistently create content that will build your audience.
If you are still lost, think about the items about which people come to you for advice. Do friends or family ask you for fitness tips? Recipe ideas? Career advice? With just a little thought, you’ll quickly determine where your areas of expertise exist.
2. Are Others Interested in The Same Things?
You might feel like the only 20-something who’s obsessed with knitting. But there are others out there.
Do a quick Google search, and you’ll find over 1 million results aimed at people just like you.
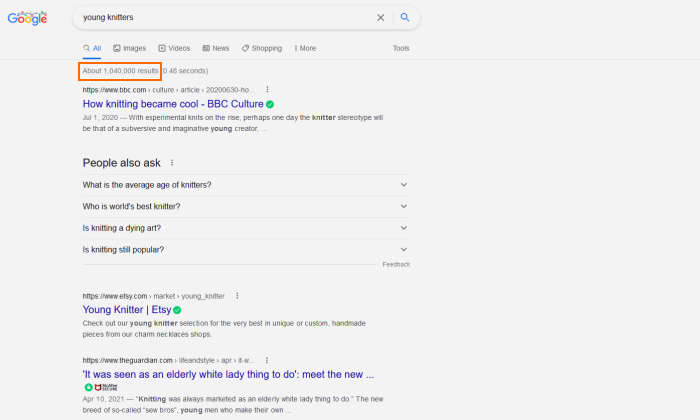
You might be wondering if your idea is too quirky. Or, is it too broad? My advice is to get as focused as you can on something you’re genuinely interested in.
If you want to start a travel blog, for example, stay away from generic words like “travel.” Choose a more specific topic, like “backpacking.”
Step 2. Choose a Name For Your New Blog
Now for the fun part: naming your blog.
This is your brand. It’s how people will remember you.
But don’t overthink it. The magic of a brand gets built over time. Even if you feel stuck, keep moving forward.
The best way to land on the perfect name is to start with brainstorming. In the last step, we talked about unleashing all of your ideas and nailing down your niche.
Now, it’s time to take those ideas and turn them into a name.
So, open up a new spreadsheet or grab a pen and paper. Then spend about ten minutes writing down every word that comes to mind.
From there, start combining words and phrases until something stands out to you. Aim for 5 – 10 potential names and write them down.
Now, it’s time to see if those names are available as domains. A domain is where your blog lives on the internet.
As an example, neilpatel.com is my domain.
Neil Patel is who I am, but it’s also my brand and what you type into the address bar to find me. But that also means you can’t use the domain because I already own it.
You could do what I did and use your personal name as your domain.
But in most cases, I recommend choosing a different name for your blog. That’ll make it a lot easier to sell the site if you ever want to.
Once you have your list, you can go to Bluehost’s domain name checker to see if any of them are available.
If none of your preferred site names are available as a .com, head back to the beginning and keep brainstorming.
Here are some extra tips for choosing an excellent domain name:
- Always choose a .com when possible
- Avoid using numbers, hyphens, and homophones (words that sound the same but are spelled differently)
- Keep it as short and concise as possible
- Should be easy to say and understand
- Avoid complicated and commonly misspelled words
When you land on an available domain name, don’t buy it yet. I’ll show you how to get it for free in the next step.
Step 3. Get Web Hosting with Bluehost
Now it’s time to get your blog live.
It may seem complicated at first, but don’t worry. It’s much easier than it sounds.
To get started, you need web hosting (where your blog lives) and a domain name (your blog’s address). The good news is that Bluehost, my favorite web hosting company, offers both as a package deal.
It’s also an incredibly affordable option to host your new blog.
To get started, head over to Bluehost and scroll down until you see a breakdown of the hosting plans.
You’ll see four different options—I recommend the Choice Plus plan because it’s the cheapest plan that includes a free domain name and domain privacy for the first year. It also includes a free SSL certificate, a free CDN, 40 GB of storage, daily backups, and malware scanning. I like this plan because it gives you everything you need and offers you plenty of room to grow.
If you don’t want to pay that much, you can choose the Basic plan to save a few dollars per month. However, it doesn’t come with a free domain name so you’ll need to purchase one. If you buy one through Bluehost, a .com will cost $12.99 for the first year.

If you want the best deal in the long-term, you’ll need to pay for three years in advance. You’ll pay slightly more per month for the first year, but you’ll get a better deal on years two and three, so it pays off in the long-run.
With that said, the 12-month plan is a good deal, too, if you don’t want to commit to three years up front.
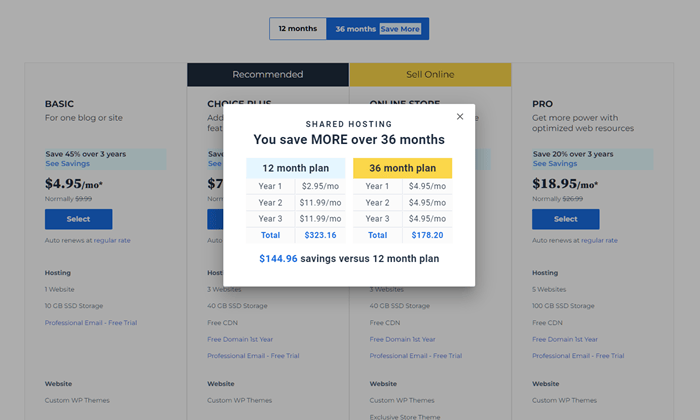
Once you’ve chosen a plan and contract length, click the blue “Select” button under the appropriate plan to start the sign up process.
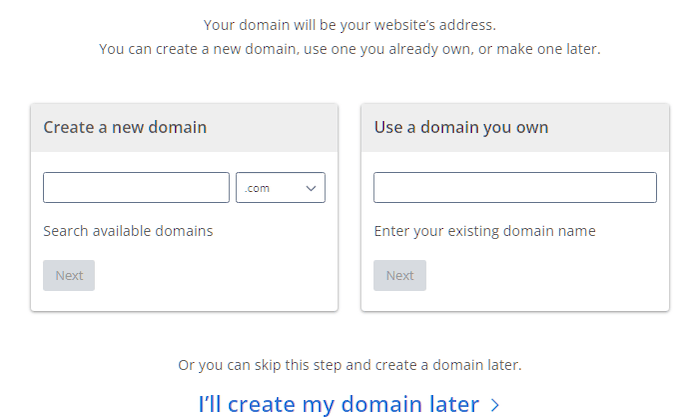
The first step is adding the domain name you came up with in step two. If you haven’t decided on a name yet, that’s okay. You can click “I’ll create my domain later”.
Next, you’ll enter all your basic account details, including your name, country, address, and email. Below that, you’ll see all of your package details. Double check that everything here is correct.
From there, you’ll see a list of add-ons. You get a free SSL with your plan—the paid SSL add-on is an upgrade from the free version, which you don’t need at this stage. You can get similar SiteLock Essentials features for free with a WordPress Plugin, Yoast’s free SEO version is more than enough, and you can purchase Google Workspace directly from Google if you decide you want it later.
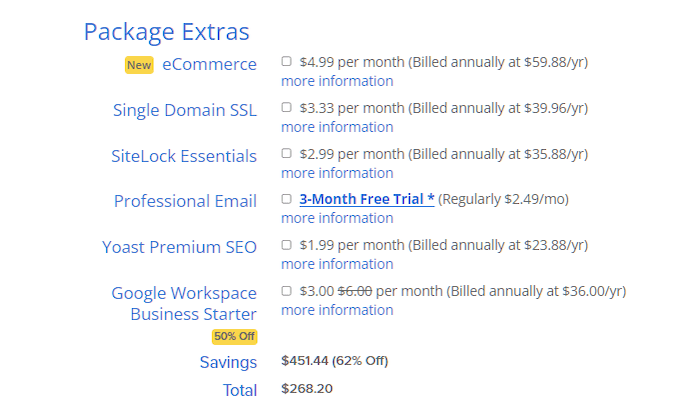
So, unless you’re creating an ecommerce store alongside your blog, you don’t need any of them.
All that’s left of the checkout process is entering your payment information and clicking “Submit”. Once you’ve done that, you’ll be taken to a guided setup wizard that walks you through every step. The only thing you need to make sure you do is choose WordPress when asked how you want to build your site.
After that, you’re done with the hardest part! Congrats on your new blog!
Step 4. Get Familiar with WordPress, Your Blogging Software
You can’t start a blog without blogging software. I run all of my blogs on WordPress because it’s user-friendly, free, and powerful.
If you decide to make a blog that’s not on WordPress, you’ll find that it is much more costly. WordPress offers a ton of free plugins that allow you to modify your blog in any way, shape, or form.
What’s nice is that Bluehost takes care of WordPress installation for you during setup. You don’t have to do anything to get it ready to use.
Once you’ve finished the guided setup process and logged into your Bluehost dashboard, Click My Sites on the left side, hover over the website you created, and click “Manage Site”. From there, you’ll see a button to Login to WordPress.
This will take you to your WordPress backend where you’ll be able to add pages, make new blog posts, edit the look and feel of your site, install plugins, and more.
Spend a few minutes clicking around to get comfortable with where everything’s at.
Step 5. Design Your Blog With a WordPress Theme
In the blogging world, pre-built WordPress site designs are called themes.
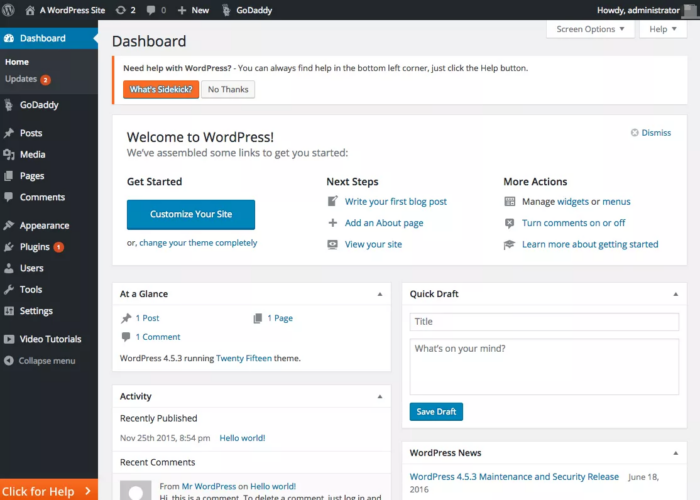
Out of the box, your WordPress blog will look something like this:
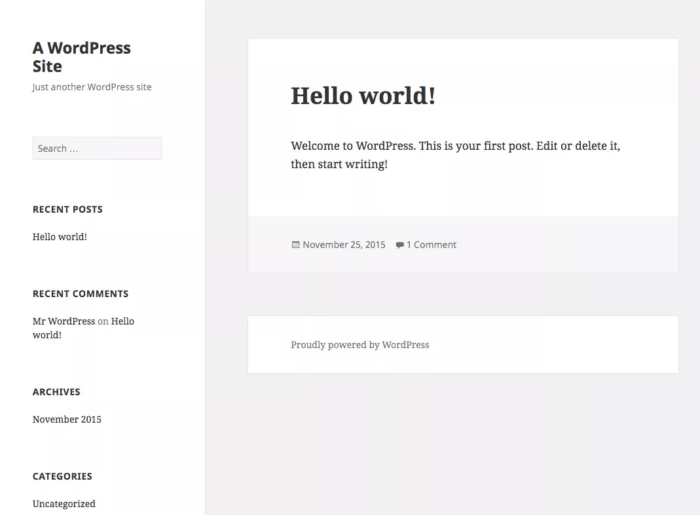
That’s the simple foundation you start with. But you’re going to want to find something that fits with your name, brand, and the experience you want readers to have.
There are thousands of themes to choose from. But it can be easy to get trapped in “shiny object syndrome,” browsing through tons of pretty pictures and templates but not walking away with a theme that fits your needs.
You can swap out your theme any time, so choose something that’s good enough for now rather than stressing over the perfect option. Like your brand, your WordPress blog’s theme will probably evolve over time as you figure out what works and looks best in practice.
Let’s go through selecting a theme step by step.
First, you need to log into your WordPress admin. You can access this by going to [yourdomain].com/wp-admin.
Enter your user credentials to log in.

If you’re new to WordPress, the dashboard might look a little daunting at first, but you’ll be an expert with a little practice.
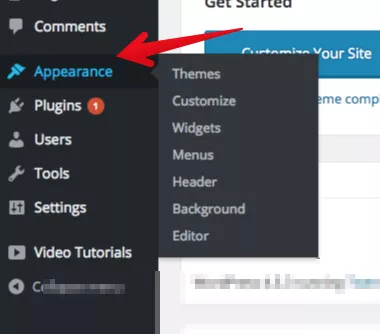
To install a new theme, hover over the “Appearance” menu in the sidebar and click “Themes.”
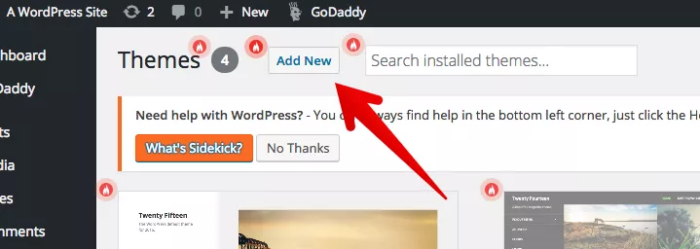
WordPress comes with a few themes ready to go, but we’re going to search for the flashier premium themes that will make your eyes twinkle.
Click the “Add New” button at the top to get access to thousands of WordPress themes.
Your tastes and mine may be different. Fortunately, WordPress has a “Feature Filter” that lets you search for something that will fit your style.
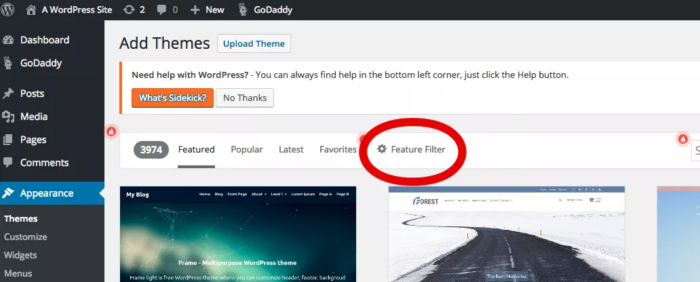
The three categories are “layout,” “features,” and “subject.” You can look for themes that closely hew to what your blog is going to be about or ones that have features you’re already sure your blog will need.
Here’s what your filter requests might look like.
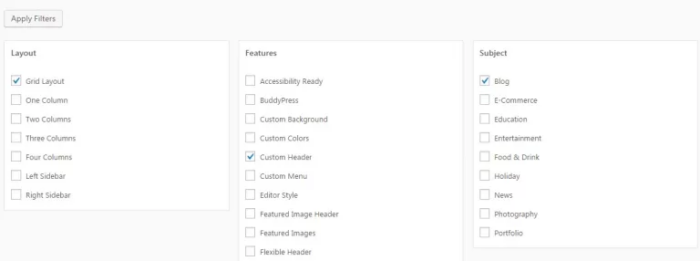
After applying the filters, you’ll see amazing themes that would otherwise cost thousands of dollars in design fees.
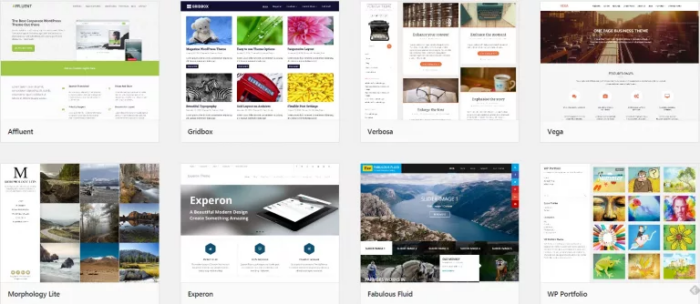
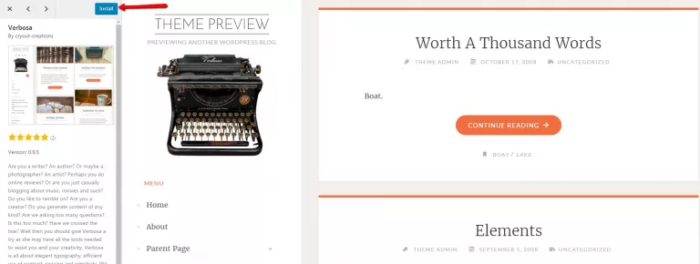
If you click on the theme’s thumbnail, you can get an instant preview of what your blog will look like. Evaluate if it fits both your personal style and the topic that you’ll be covering.
Once you’re satisfied with the sneak peek, click the “Install” button.
Once the installation is complete, click the “Activate” button, and you’re all set.
If you can’t find a theme that you like, there are premium themes that you can purchase from sites like:
By now, your theme should be activated and ready to go. Let’s move on to customizing your theme.
Step 6. Customize and Optimize Your WordPress Blog
There are endless customization choices that you can make on a WordPress blog. We’ll stick with the essentials.
Themes are the foundation of your design and include the core functionalities. WordPress also has plugins that can add to or extend the functionality of your blog in impressive ways.
There are WordPress plugins for everything from adding e-commerce functionality or contact forms to your site to analyzing your content for SEO improvements (more on that in a bit) or boosting site security and performance.
The first step is to click the “Customize” button on your active theme.
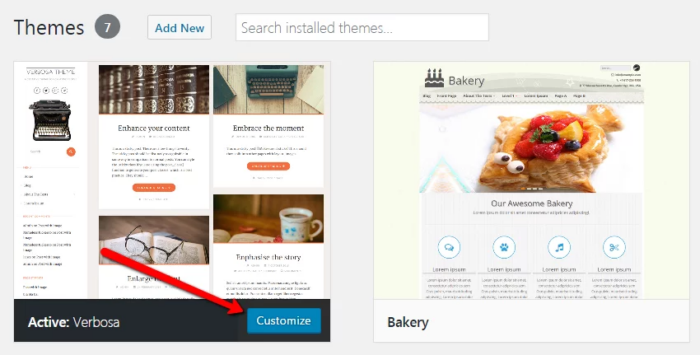
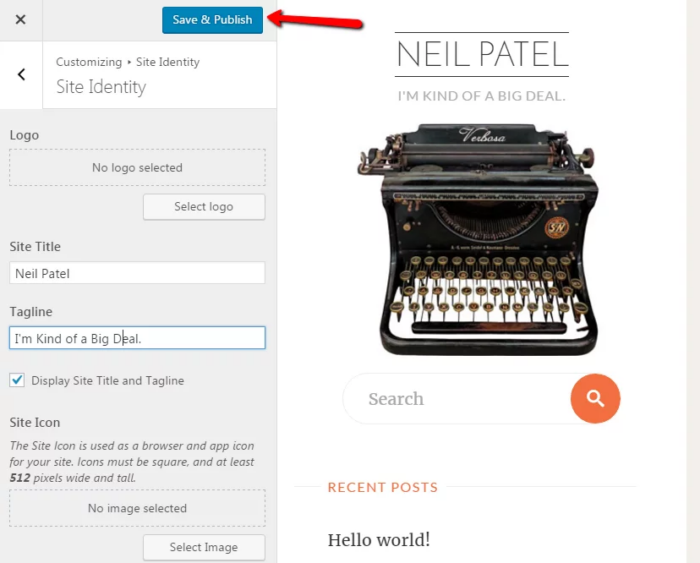
Menu options in the sidebar will vary depending on the theme you choose. The main category to edit is “Site Identity.”
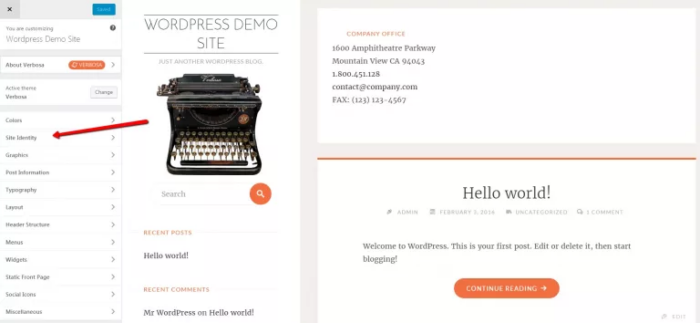
Here, you can add the name of your blog and a tagline if you wish. When you’re done, click the “Save and Publish” button.
Optimize for Search Engine Traffic
Search engine optimization (SEO) is a multi-billion dollar industry.
SEO is the process of optimizing your website to be found in search engines for particular keywords and phrases.
I attribute a good portion of my success to being easily discoverable for relevant search terms, which has helped me build my networks and net worth.
If you’re new to SEO, then this may seem daunting.
With that said, WordPress makes it insanely simple to optimize the technical aspects of your blog.
The majority of your SEO efforts will be focused on creating engaging content for real people. Whether that’s through text, videos, or images, your job as a blogger is to spark a relationship with your readers.
And, what better way is there than through relatable and informative conversation?
You can get started by downloading a plugin called Yoast SEO.
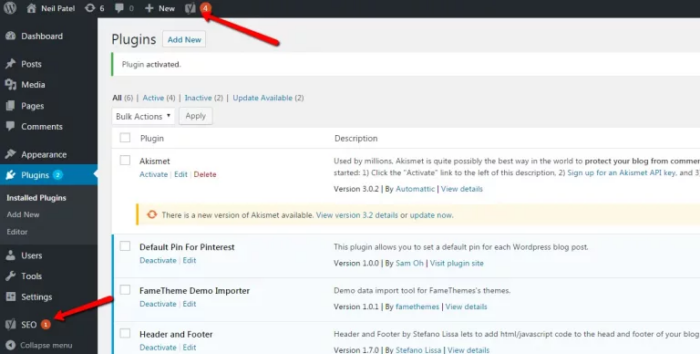
Hover over the plugins menu on the side and click “Add New.”
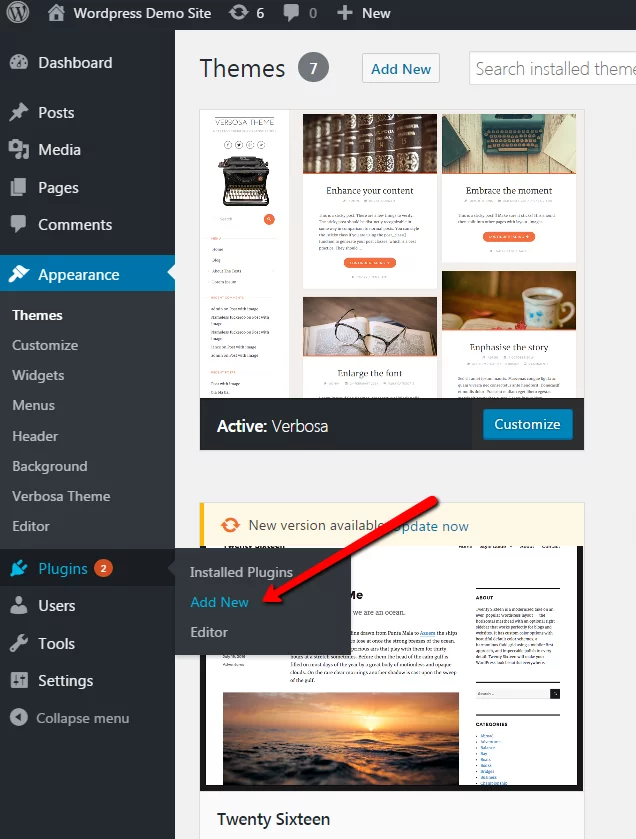
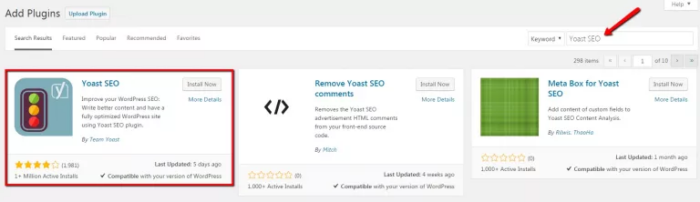
Search for “Yoast SEO” in the search bar, and it will be the first result that comes up.
Click the “Install Now” button. Then, hit the “Activate” button once the installation is complete.
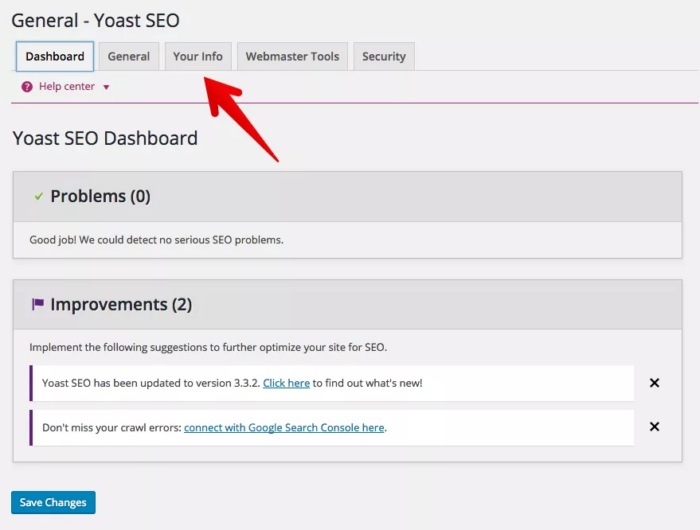
You can access the plugin’s settings from the new SEO menu in the sidebar or by clicking the icon at the top.
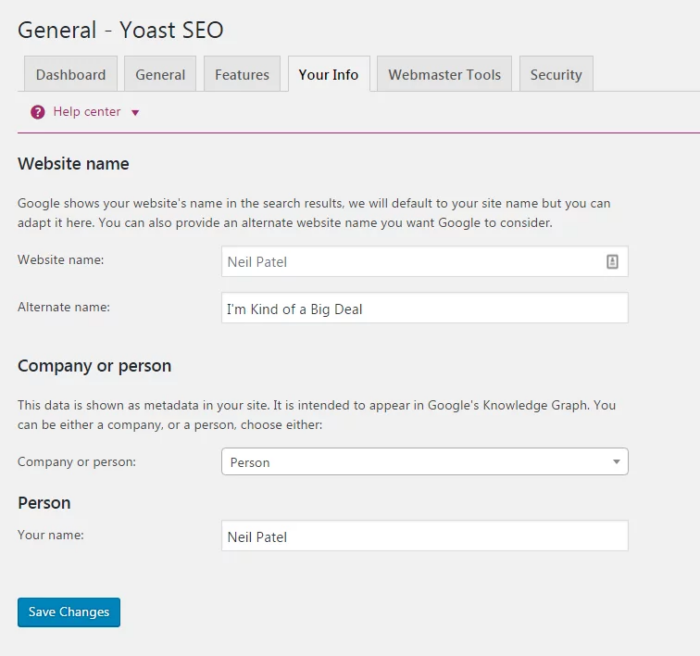
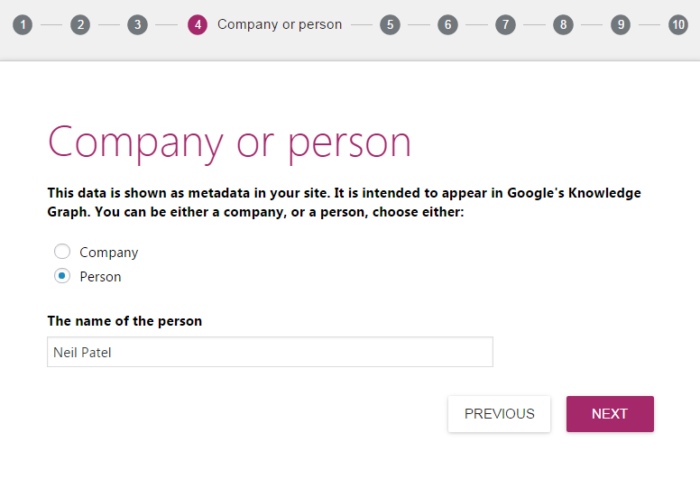
From the dashboard, go to “Your Info” and set the foundations for your blog.
Make sure that your website name and tagline are correct. Then, identify yourself as a company or person.
Click the “Save Changes,” button and we’ll move on to the next step.
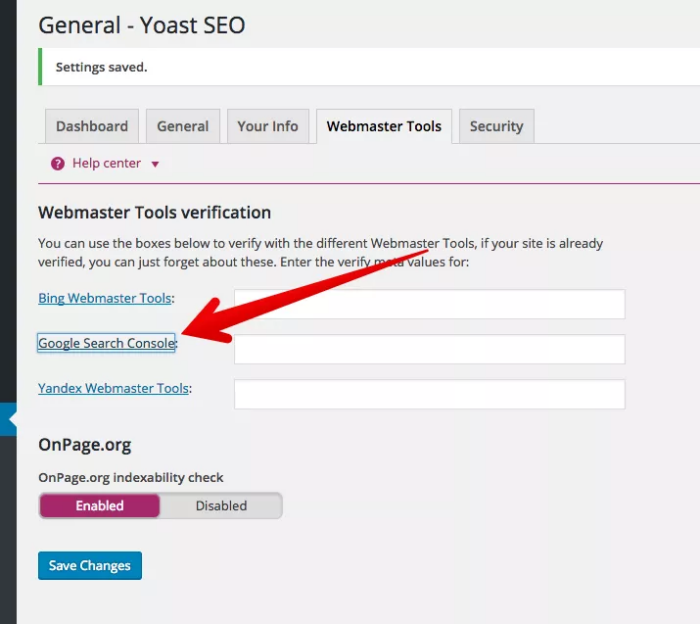
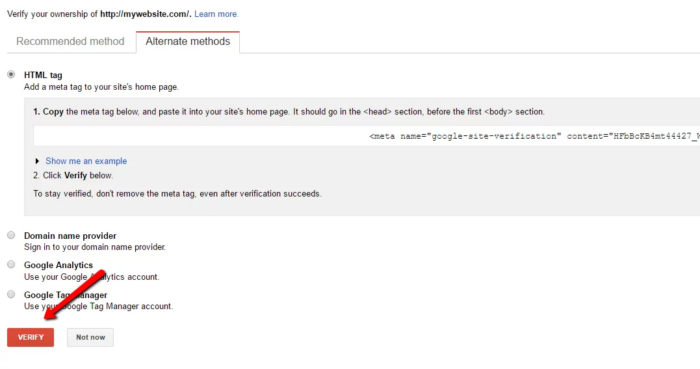
Next, go to the “Webmaster Tools” tab and click “Google Search Console.” Google Search Console is a webmaster tool that allows you to submit your site to their search index and optimize visibility.
Sign into your Google account, whether that’s your Gmail or Drive account.
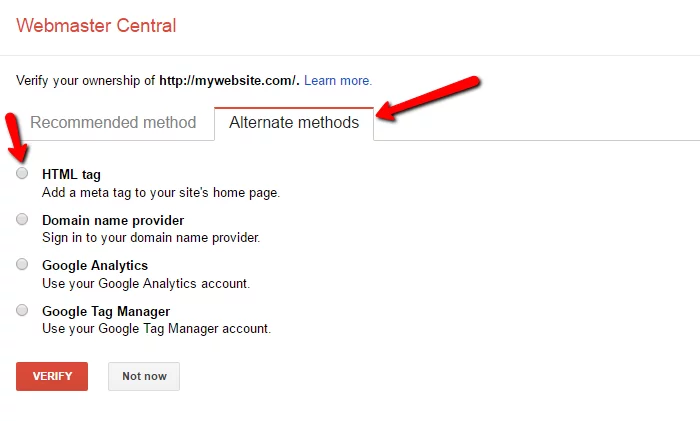
Once you’ve logged in, click the “Alternate methods” tab and select “HTML tag.”
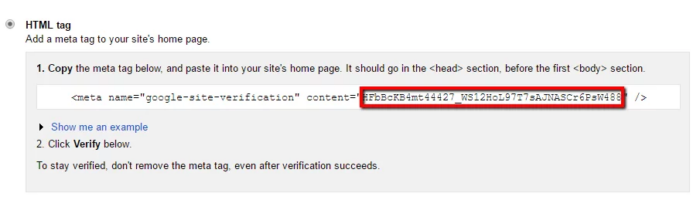
A new drop-down will appear with your search console meta code. Copy the alphanumeric string without the quotation marks.
Next, paste your meta code into the Google Search Console text box and click “Save Changes.”
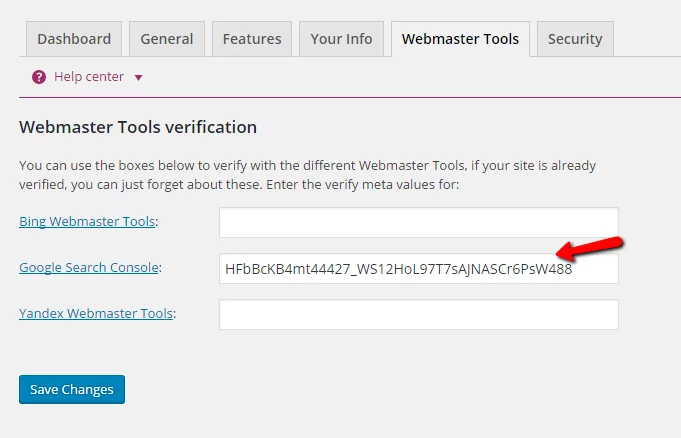
Finally, click the “Verify” button.
As you tinker around in Webmaster Central, you’ll gain a wealth of data-driven insight, such as keyword phrases you rank for, errors on your blog, and the ability to give Google a nudge when you publish a new post.
Next, go to the “General” tab and start the installation wizard.
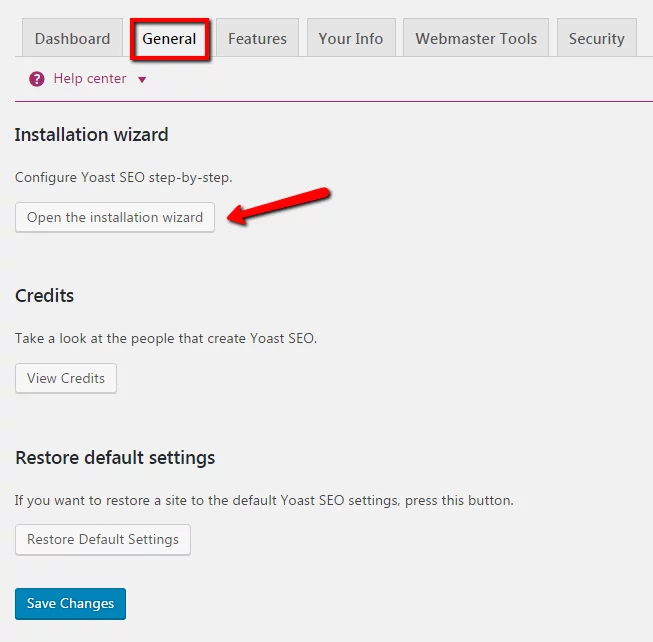
Yoast will take you through a series of 10 quick steps to optimize your WordPress blog.
The first step is a welcome screen that you can skip.
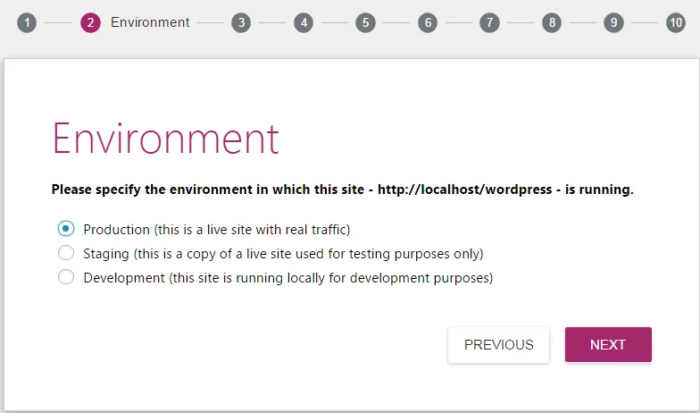
In the second step, select the environment that best suits your site. Most likely, you’ll choose the production environment, which means that it is a real website that you intend to drive traffic to.
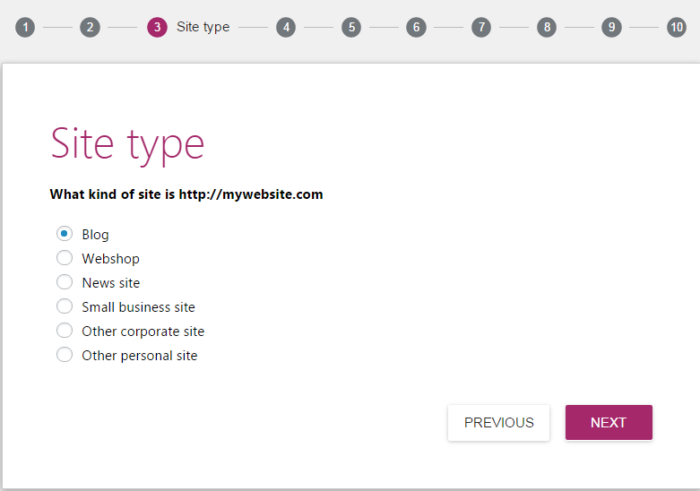
Step 3 is the website type. Choose blog and click next.
The next step is to set yourself up as a company or person. We already set this up before, so you can skip this step.
In step 5, you can add any social profiles that are associated with your blog. Click “Next” when complete.
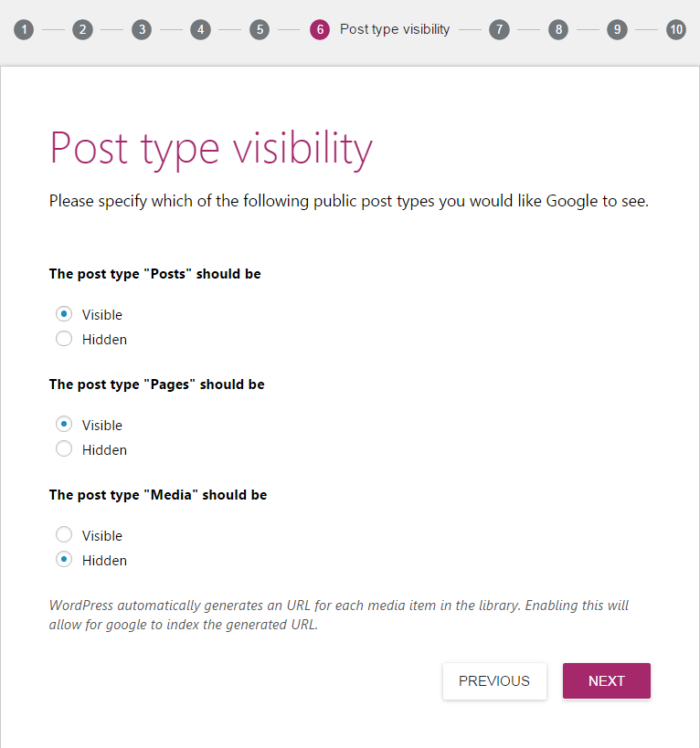
Step 6 is about post visibility. The default settings are fine to use. Set your “Posts” and “Pages” to visible and “Media” to hidden.
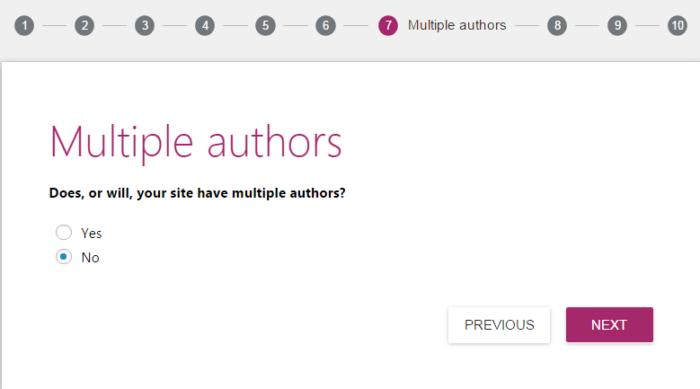
Next, you’ll have to decide whether you’ll have multiple authors or a solo blogger. If you choose to add another writer in the future, you can change these settings later.
If you wish to have the Yoast SEO plugin pull in data from Google’s search console, step 8 is the place to do it.
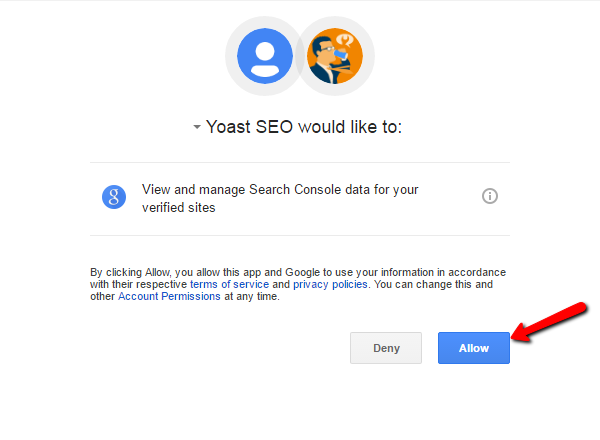
Click on the “Get Google Authorization Code” button.
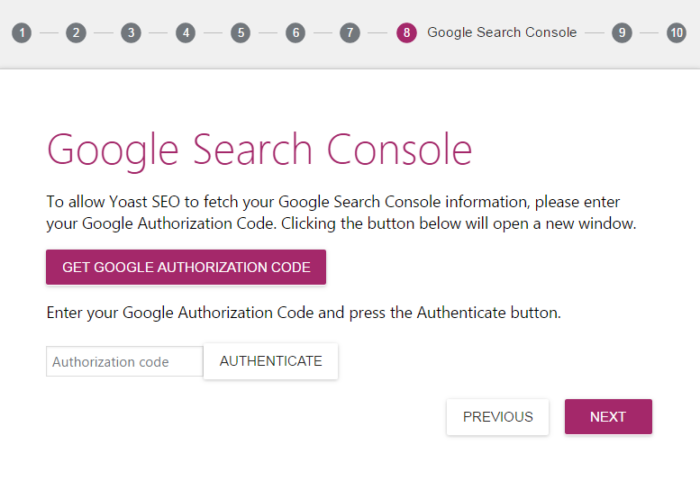
A new pop-up will appear where you can allow Yoast to access your search console data. Click the “Allow” button to confirm access.
In step 9, you can verify your website name and choose a title separator.
The title separator is a symbol used to separate your blog post’s title and your website’s name in the meta title information. This is what Google searchers will see when finding your blog through a search query.
For instance, if you found this post on Google, you might have seen “How to Start a Blog – Neil Patel.”
The symbol is a matter of personal preference. Click “Next” when you’re ready to move on.

The final step is no step at all. It’s a congratulatory message confirming that you have successfully optimized your SEO settings for your budding WordPress blog.
XML Sitemaps
The last Yoast SEO setting worth configuring is an XML sitemap. An XML sitemap is a file that lists the URLs for your website.
It helps Google and other search engines crawl your site for new posts and pages. Fortunately, Yoast has a built-in feature that automatically updates your sitemap, so you can click it and forget it.
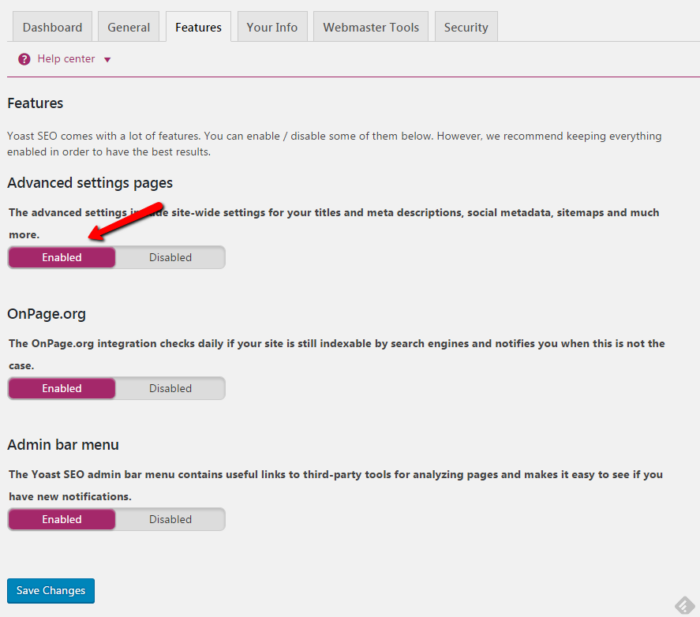
In the “Features” tab, set the “Advanced settings pages” to “Enabled” and save the changes.
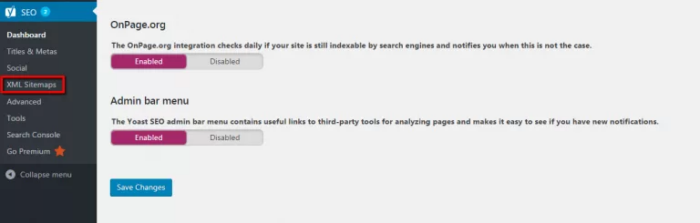
A new group of menus will appear in the sidebar, under “SEO.” Select the “XML Sitemaps” menu.
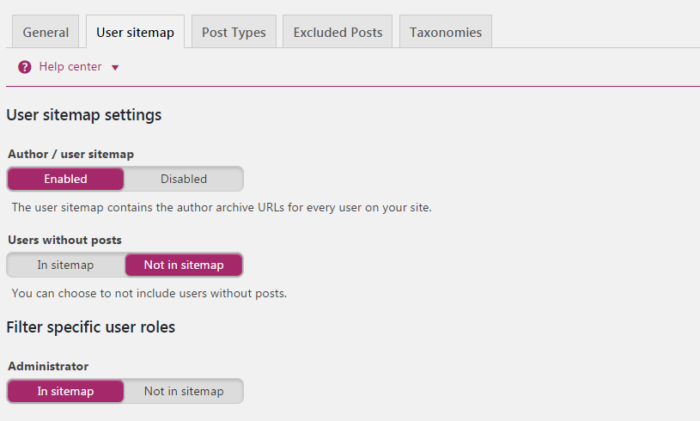
Select the “User Sitemap” tab and toggle “Author/user sitemap” to enabled. Don’t forget to save your changes.
You can play around with these settings endlessly, but everything that we’ve set up to this point will get you started on the right track.
Set Up Permalinks
Permalinks are static hyperlinks that lead to a particular blog post or page. By default, WordPress automatically generates permalinks when you create a post, with the post ID number coming after your domain.
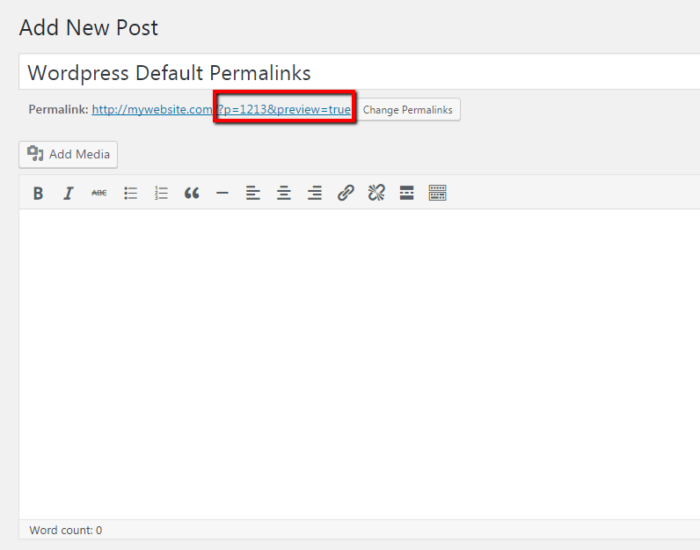
The permalink “/p=1213” isn’t appealing and it doesn’t help anyone understand what the page is about before viewing it.
The simple fix is to set a permalink structure.
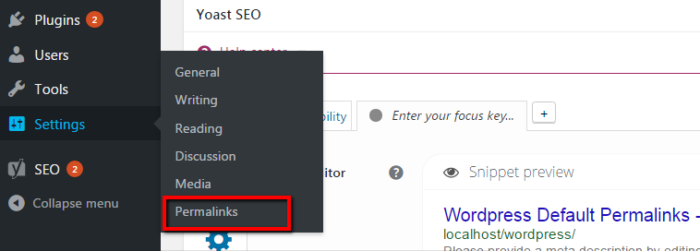
In the left sidebar, mouse over “Settings” and choose “Permalinks.”
There are a few options to choose from. I use the “Post name” structure on my blog, which uses keywords from my title to create a unique permalink.
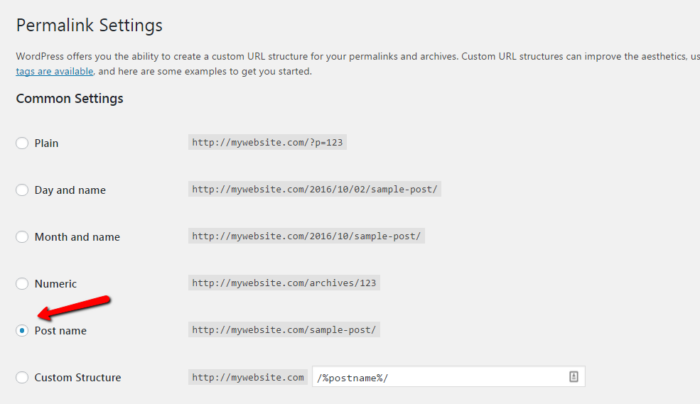
Save the settings after you’ve selected it. You’ll see this in action a bit later.
If you’re still with me, you’ve purchased your domain and web hosting, installed a theme, and optimized your website to be crawled and found by search engines.
Now, we get to the bread and butter of blogging. What are you going to write about in your blog?
Let’s find out.
Step 7. Brainstorm Blog Topics
On the technical side, your blog is all set up and ready to go. When it comes to topic generation, the world is your oyster.
The majority of your blog posts will come from personal experiences, passions, successes, failures, and new learnings.
People use questions as search queries, like:
- What should I write about?
- What to blog about?
- Should I start blogging?
So naturally, you should start off with some questions of your own. I use a series of questions and a systematic process to come up with my blog topic ideas.
No need to worry. It’s not complicated and it won’t take very much time.
By following this process, you should be able to come up with about 50 working topics within a half hour of distraction-free time.
Pull out a pen and paper or open up your favorite word processing tool.
The goal of this exercise is to get 10 answers for each question. If you can think of more, note them all.
It’s time to look through the lens of your readers with these 5 questions.
1. “What Excites, Intrigues, or Stirs Passion in My Readers?”
Examples:
- As a golfer, I get excited by hitting my driver farther. I’m fascinated by mental performance. I’m passionate about healthy living.
- As a new stay-at-home mom, I get excited by budget-friendly ideas for the family. I’m intrigued by sleep training. I’m passionate about homeschooling.
- As an avid camper, I get excited about finding undervalued camping sites. I’m intrigued by survival tactics. I’m passionate about minimalist living.
2. “What Common Challenges Do My Readers Face?”
Examples:
- Golfers might struggle with slicing the ball.
- Stay-at-home moms may find meal planning challenging.
- Campers might struggle with packing light.
3. “What Character Traits Do My Readers Possess?
Example:
- Serious golfers have emotional stability.
- Moms are patient and have a sense of humor.
- Campers are adventurous and resourceful.
4. “What Do My Readers Love About My Niche?”
Example:
- Golfers love the challenge of perfection.
- Stay-at-home moms love being a part of their child’s mental, physical, and emotional development.
- Campers love time away from the busy city life.
5. “What Do My Readers Hate About My Niche?”
Examples:
- Golfers hate playing with partners who complain all day long.
- Stay-at-home moms hate being looked down on by others.
- Campers hate getting eaten alive.
You get the point. Now that you have about 50 answers, you can begin dissecting blog post ideas from each answer. The sky’s the limit.
Here are a few examples you can extract from one answer in your list:
- Cure Your Slice: The Foolproof Guide To Hit The Fairway Every Time
- 3 Reasons Why You’re Slicing The Ball And One Stupid Simple Fix
- Never Slice Again: 9 Drills To Play Like The Pros
- 7 Training Aids For Dead Straight Ball Flight
- How To Shoot Even Par With A Nasty Slice.
Try to come up with a catchy headline that will draw your readers in and then throw them a one-two punch in the rest of your content.
7 Blogging Tips That Will Make Your Blog Successful (Storytelling Techniques)
Step 8. Write Your First Masterpiece
WordPress uses an intuitive editor, similar to your favorite word processing tools. New blog entries can be created directly from your WordPress admin dashboard.
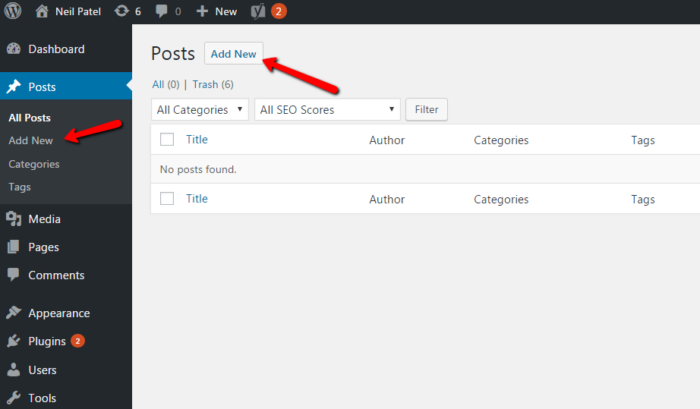
Click on “Posts” in the left sidebar.
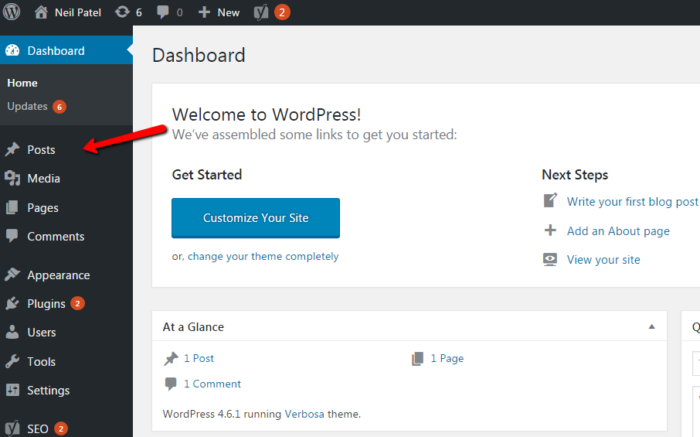
This will populate a list of your blog entries in descending order. Since we’re working with a fresh install, you won’t see anything here.
To create a new entry, click the “Add New” button at the top or in the sidebar.
You’ll be brought to the editor, and you can begin blogging.
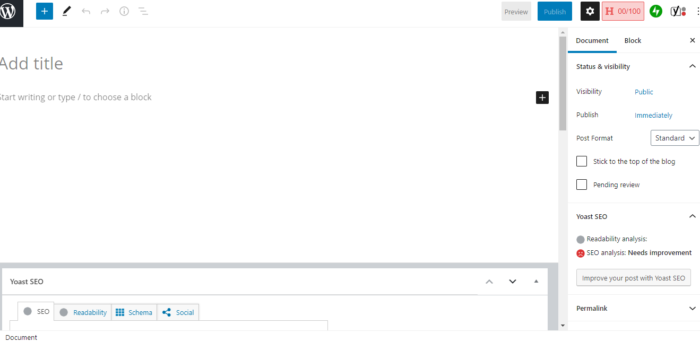
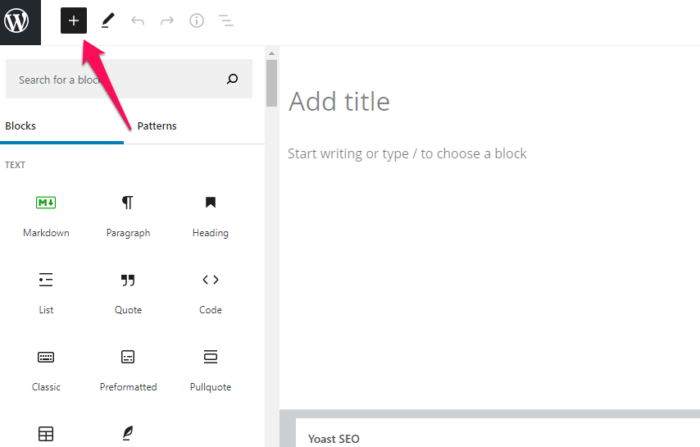
Click on the + in the right corner to see WordPress’s Gutenberg blocks, which allow you to add headings, media, quotes, and tons of other features to your blog.
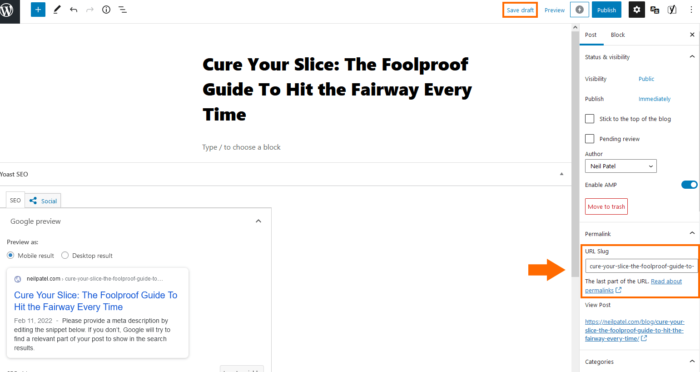
First things first, add one of the titles that you developed in your brainstorming session in the title text box.
Once you save this post as a draft, WordPress will create a permalink based on the keywords used in your title.
You can start typing the body of your article in the large text area and write until you feel happy with your content.
You’ll want to add visual assets to your blog posts as well. Images help engage readers and can often illustrate concepts better than words.
To add new images, ensure that your text cursor is in the place where you want your image to appear. Click the blue + sign, then select the “Image” block.
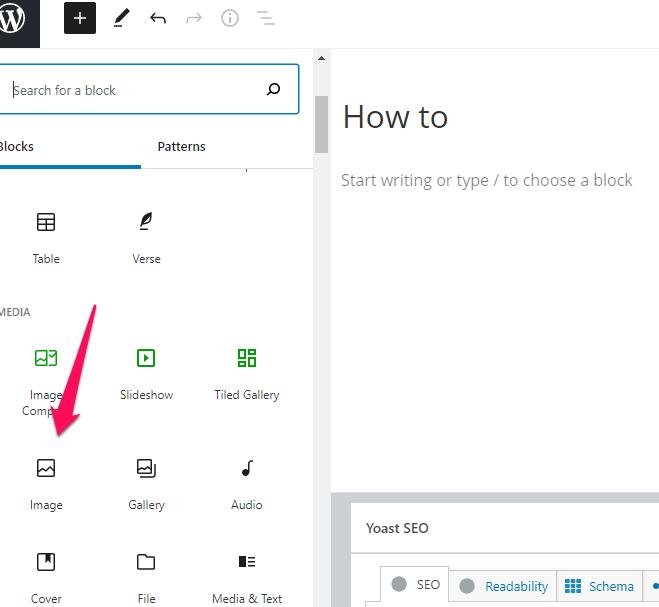
Choose “upload” or select the image from your Media Library if it’s already uploaded to your site.
After your image has been uploaded, you can resize it, and add links using the icons at the top of the image.
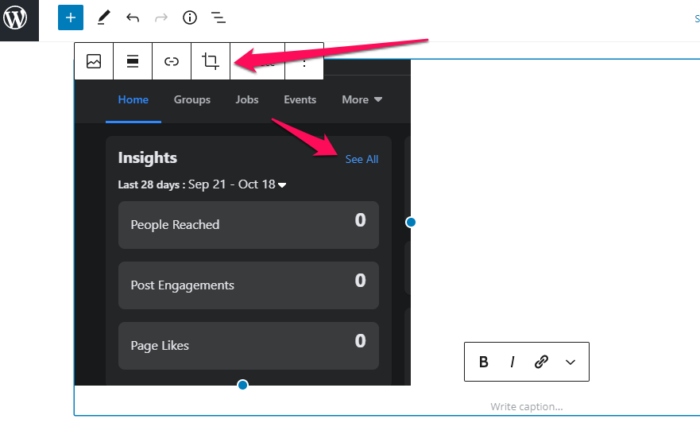
Your image will automatically insert into your post.
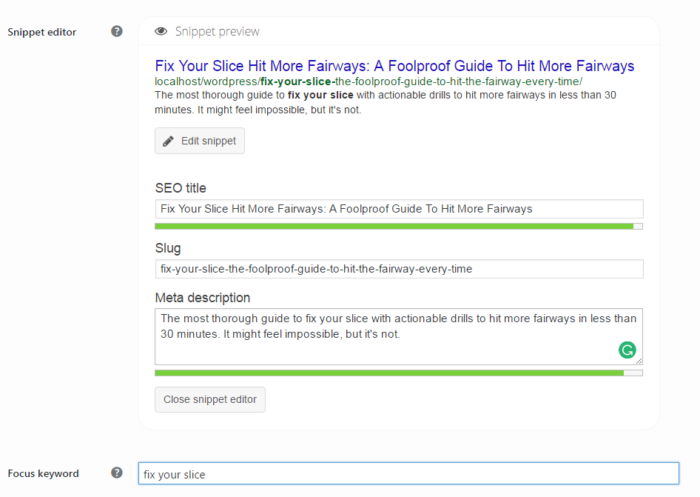
After you’ve completed your article, you’ll need to make a few last-minute optimizations using the Yoast SEO plugin.
Yoast has post-specific settings that can be at the bottom of the main text area.
The four main settings are “SEO title,”“slug,” “meta description,” and “focus keyphrases.”
Completing these settings will generate a preview of what your post will look like when it is discovered in Google’s search engine results.
Create SEO titles that are attractive to click and meta descriptions that explain what your post is about.
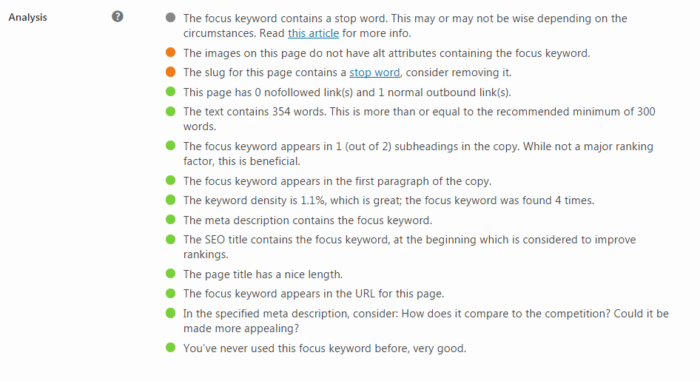
The Yoast SEO plugin will provide real-time feedback, as you begin to optimize your title and description.
Aim for as many green lights as possible, but don’t stress if you’re unable to get a perfect score. If you can get 80% green lights, then you’re on the right track.
Before you publish your post, you can view what your blog post will look like by clicking the “preview” button at the top of the page.
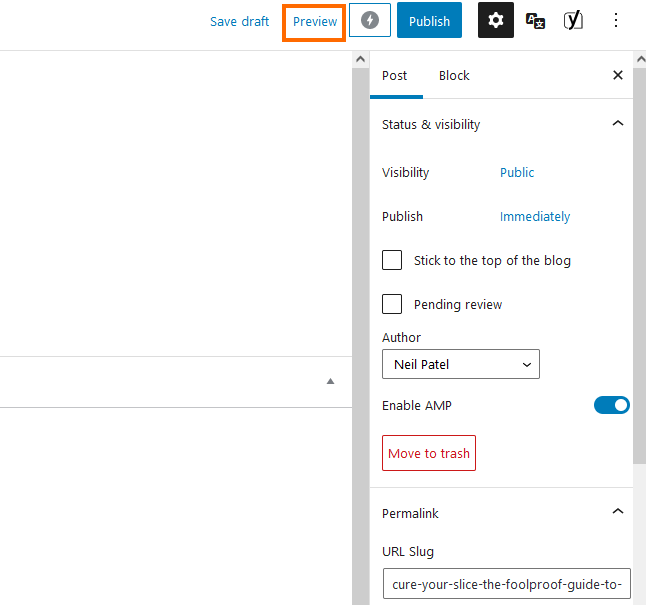
Before you hit that publish button, you want to make sure that your entry looks and feels the way that you want it to.
Here’s a quick checklist to consider before you hit the publish button:
- Speak in a conversational tone.
- Be sure the content flows naturally.
- Use adequate white space for easier readability.
- Use headings to separate sections.
- Break up content with bullet points and lists.
- Check for typos and grammatical errors.
If everything checks out, you’re ready to publish your first blog post.
Scroll to the top of the page and click the publish button that’s just to the right of the preview button to have your post go live immediately.
And here’s what my final post looks like.

Congratulations. You’ve successfully set up a blog that looks great and is optimized for search engine traffic. Feels good, right?
Step 9. Create an Editorial Calendar
One of the fatal mistakes I see bloggers make is to blog only when they “feel like it.”
They forget that new fans want more content and fail to deliver.
Unforeseen circumstances will arise. You’ll let a new Netflix series take over the time that you could have spent blogging.
Life will continue to throw curveballs at you, whether you start blogging or not.
Consistency is undervalued and it needs to be something you prioritize.
I’ve written over a thousand articles and it’s not because I type 7,000 words per minute.
It’s because I follow an editorial calendar without compromise.
Schedules aren’t just for big publications like The New York Times and the Huffington Post. They’re for regular people like you and me.
Think about it like this.
If you have a doctor’s appointment on your calendar or even a lunch date with a friend, you’re going to honor it. Worst case scenario, you’ll reschedule for the next available timeslot.
Editorial calendars work in a similar fashion.
They make aggressive goals reachable in micro-steps. They keep you organized. They streamline your social media and email marketing efforts.
Also, you’ll be surprised at how an editorial calendar can even help you grow in character and integrity.
We are creatures of habit.
The better you keep your dates, the faster you’ll grow your audience.
So, how do you get started and how much will it cost?
Nada.
Just open up a new Excel spreadsheet. If you have multiple writers, you can share the sheet using Google Drive.
Start with four columns – Publishing Date, Title, Keyword, and Notes. Below is an example of one of my editorial calendars from a previous year. I still set up my excel spreadsheet the same way even today.
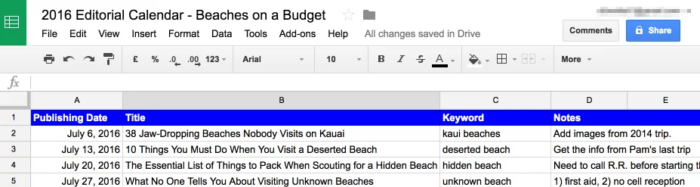
Your needs might be different than mine, so feel free to add additional columns as needed. Common additions might include “Author,””Category” and “Persona.”
The simpler you keep it, the easier it will be to digest and follow.
Look through your calendar on your iPhone, Android, or the one hanging on your fridge. How often can you post?
Monthly? Weekly? Daily?
Be conservative with your goals because consistently missing deadlines can lead to quitting altogether.
Next, go through the answers that you came up with in your brainstorming session and add them under the “Title” column.
Your titles don’t need to be perfect yet. Throw in a working headline that you can spruce up before publishing.
Sometimes, the best headlines come after you’ve written your article. You’ll have a crystal clear picture of what your story is about and who it is for.
The “Keyword” column is intended for SEO purposes. If you’re targeting specific keyword phrases that you’d like to rank for, add those in there.
If nothing comes to mind, you can do some keyword research later on.
Finally, there’s the “Notes” column.
This section is a perfect place to write down brilliant ideas that come to mind. Notes also act as a great tool to stay focused on the topic at hand and tackle it coherently.
You should be able to write up a set of 25 blog post topics with deadlines that you’re confident about keeping.
That’s almost half a year’s worth of blog posts for a weekly writer.
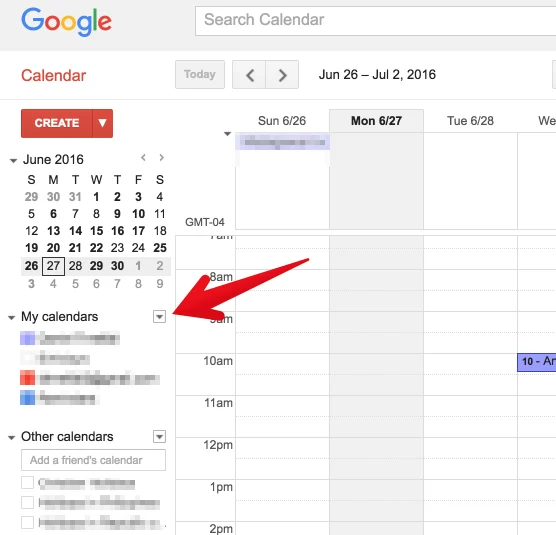
Okay. You have the editorial, but you’re still missing the calendar.
Go to Google Calendars and set up a new calendar. You can do this by clicking the down arrow to the right of “My Calendars.”
Click “Create New Calendar” and add a name, description, and time zone. You can share this calendar with other participants on your team.
If you don’t have team members, share it with your spouse or a good friend who is willing to keep you accountable for your goals.
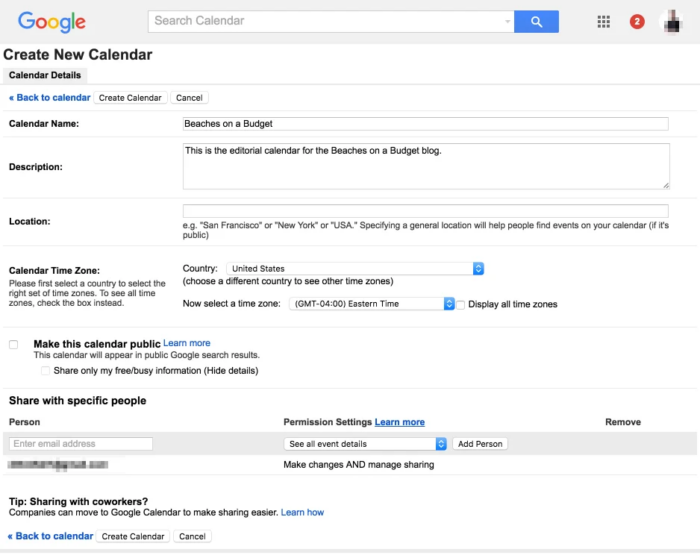
After you’ve filled out the essential information, click “Create Calendar” and get acquainted with your new best friend.
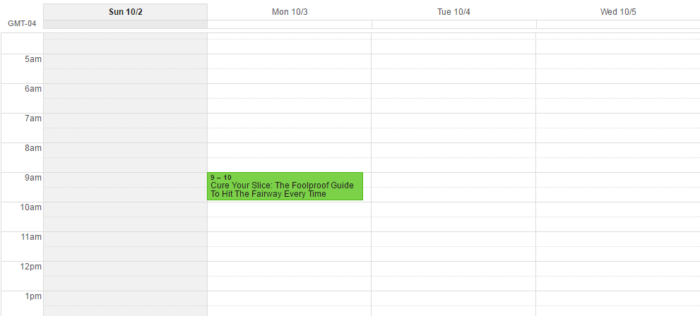
Make sure that your calendar is selected in the left sidebar and change your schedule view to weekly.
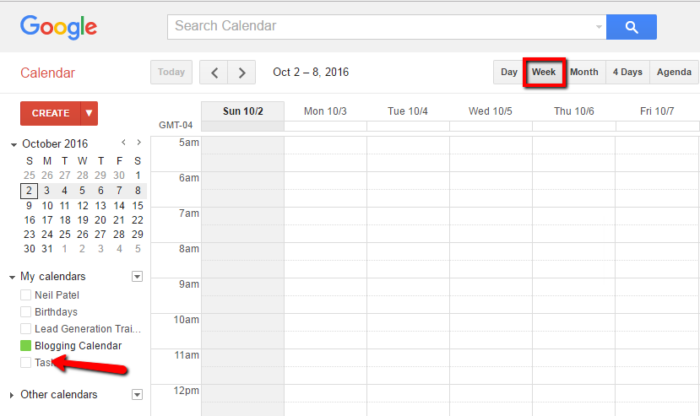
Click on a time slot under a day and add your blog post title as the “Event Title.” I recommend that you set a notification for a couple of days before the publishing date.
If you only write whenever it’s convenient, you’re heading down a dangerous road.
You’ll eventually run out of ideas, lose motivation and forget about the drive you once had to start your own blog.
Editorial calendars are a quick fix for a blogger’s procrastination.
Step 10. Monetize Your Blog
The last step is to monetize your blog.
You may not start your blog with the intention to monetize it immediately. If that’s you, then it’s a good thing.
Hear me out.
The conventional style of selling used to look something like this:
- Think of an idea
- Create a product
- Try and sell the product
- File for bankruptcy
This method has been unsuccessful for so many individuals and businesses because they didn’t build an audience before selling.
They based market demand off gut feelings.
That’s why blogging is the perfect channel for monetization. You’ll build an audience through your blog posts, email newsletters, interaction in the comments, and social media channels.
Want some pointers for how to turn your blog into a money-making device? Read on.
Ask Your Audience
Blogging brings people into your life through interaction. If you think of your favorite bloggers, you might feel like you know them on a somewhat personal level.
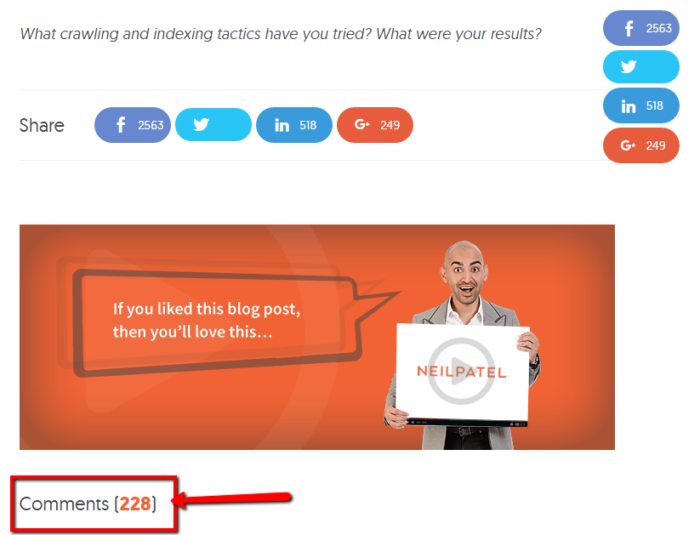
Better still, your market research becomes significantly easier. I ask questions at the end of my blog posts that generate hundreds of comments.
Alternatively, you can also send email blasts with a survey, using something like Google Forms, to gain valuable information on what your target audience wants.
By building a blog, you open doors to talk with potential customers. People who will give you honest feedback on what they want from you.
If 90% of your survey respondents tell you that they want a formal course on digital marketing, then what do you think they want?
A digital marketing course that they will happily pay for.
Sell Physical Products
Another avenue I’ve explored is in the nutrition niche.
Mike and I built a blog from scratch and transformed it into a $100,000/month blog selling a private-label fish oil supplement on Amazon.
Our success was mainly due to our blog. We published great content, understood our audience’s needs, and directed them to our Amazon sales page.
You don’t need to go down the same fish oil-peddling road I did, but trust me when I say your blog can be one of the best ways to get more people buying your physical products.
Make Money With Advertisements
If you don’t want to sell a physical product or service, you can do what other publishers are doing: sell advertising space.
Anyone can put an ad on their blog using Google Ads. But, the real money comes from private sales of ad placements on your site.
If you build a high traffic blog, you can make a full-time income selling ad spots on your website.
Talk about passive income!
The only thing that you need to do is to add their banner and keep doing what you do best: write about your passion or expertise.
The reason why monetizing is the last step in creating a profitable blog is because money shouldn’t be the driving factor in your early efforts.
As you build meaningful relationships and community, your audience will steer you in the right direction by sharing their needs.
If you want to make money blogging, then it will be your job to fulfill those needs.
Offer Premium Content Like E-Books
One more direct option to get more money out of your blog is providing additional content beyond what you already offer at a price.
As an example, let’s take a look at Make A Living Writing, a site for freelance writing education. The site offers regular blogs, freelance job listings, and other resources for writers. One of the first things you’ll see on the homepage, as of this writing, is an offer for a free e-book.
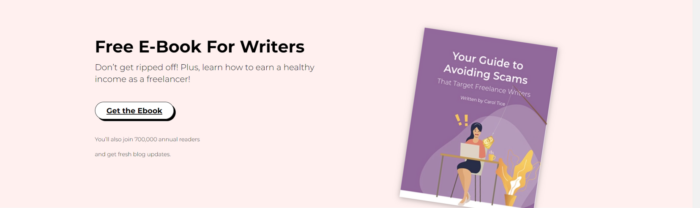
So where’s the premium content if the book is free? Scroll further down, and you’ll see information about the paid Freelance Writers Den community:
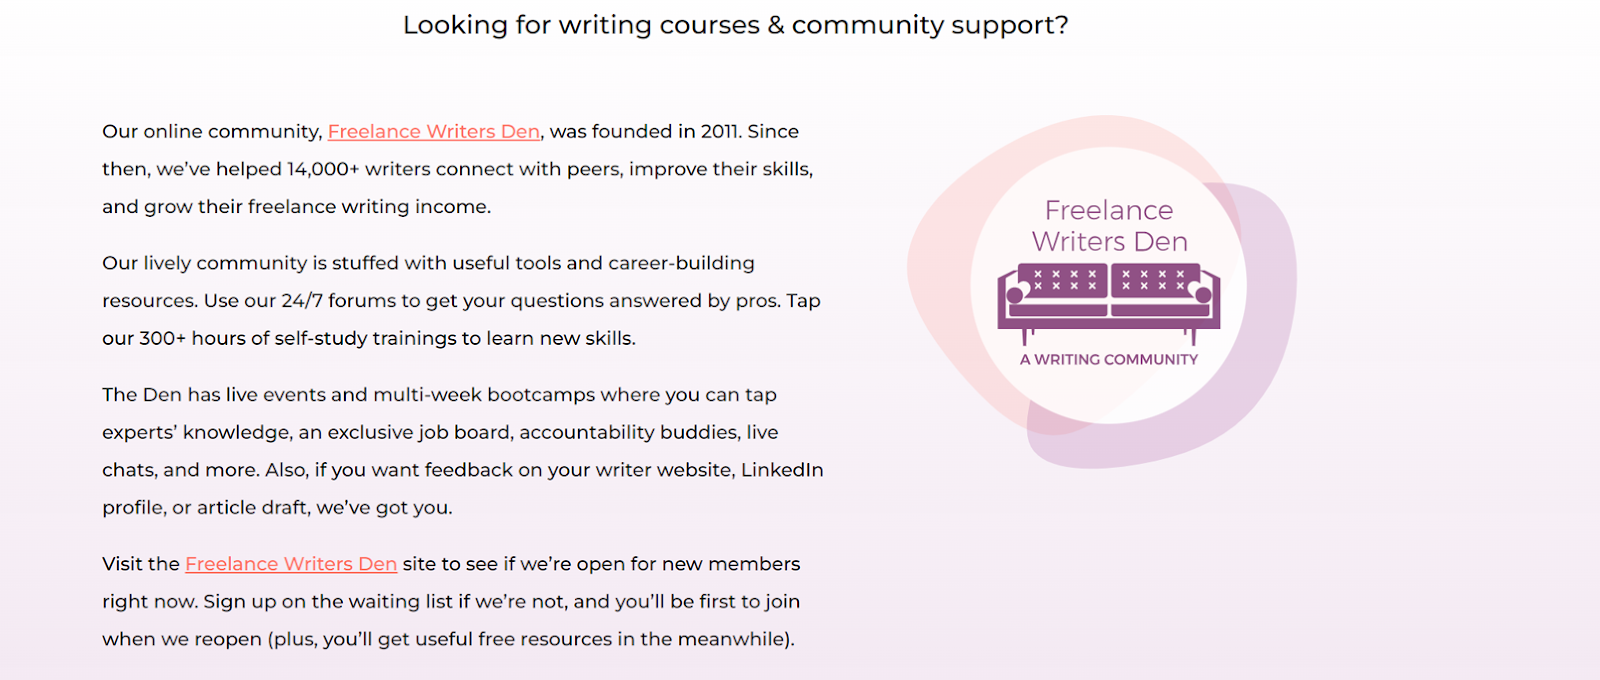
In this case, the appearance of premium content (an e-book) leads to paid premium content (the Writers Den). This is smart because it creates a little mini-sales funnel.
People may come to the site for the blogs, see the free e-book, download and read it (getting onto the email list, I might add). A
After they read all the content, the Writers Den suddenly looks like a lot more appealing of a concept.
Affiliate Marketing
What if you don’t want to sell a physical product or service, but still want to monetize?
Leverage your presence to sell products for someone else. Affiliate marketing is the most straightforward way to do this. This is when you promote other products on your blog and get a commission off of each sale that can be traced to your blog.
So how does this work?
It all starts with finding an affiliate network or program you like. These cover different products and process payment differently, so pick the best fit for you.
After that, all you have to do is create content that uses the custom links provided by your affiliate program.
You don’t necessarily have to do product reviews to get involved in affiliate marketing. Let’s take a look at cooking blog Corrie Cooks:

This is primarily a recipe blog, but still earns affiliate commission via links to different products. Any blog can work for affiliate marketing if you find the right merchants to work with.
Influencer Marketing/Sponsored Content
Once your blog becomes more established in its niche and you begin to promote yourself, you may find yourself becoming an influencer. In the marketing world, an influencer is anyone who collaborates with a brand to promote products or services to their audience.
Most people think of social media influencers, but you can also build a following as a blogger as well, and turn that into a monetization opportunity. This is generally done through sponsored content.
In this case, a blogger partners with a company to create a blog that promotes the company. There’s also an affiliate link in many cases, but in this case, the entire piece of content is built as a collaboration between blogger and company. See this example from Buzzfeed:
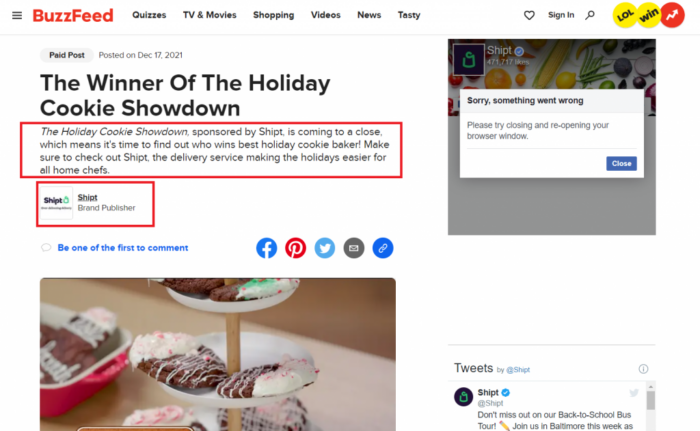
Sponsored content isn’t limited to blogs, either. Companies can invest in paid tweets, infographics, premium content, whatever makes sense for your audience.
This may seem a bit strange at first, and some people call the practice deceptive. Not necessarily.
Sponsored content may be sponsored, but it can still have value to the reader. In fact, this is the key principle to being effective with this tactic.
Consider Crowdfunding
In some cases, you may want to monetize a blog to keep it running, but may not necessarily be looking to make a huge profit off of it. In other cases, you might want to monetize the blog and make as much money as possible, but use it towards a cause. This is where crowdfunding is a great idea.
Crowdfunding is something I know a bit about from my startup experience. But it also has value in the blogging world as well.
Transparency is essential here. You can use the same major crowdfunding platforms like Indiegogo or Kickstarter, and the CTAs (calls to action) for your blogs would be links to said platform.
People have had success with this method. One blogger was able to raise 37,000 AUD for sustainable initiatives primarily through their blog. However, just like if you were selling a product, you need to keep the following things in mind:
- Be ready to explain and show how the money is being used to keep the trust of your readers.
- Focus on targeting audiences with your content who are more likely to support the cause you are crowdfunding for.
- When the crowdfunding period is over, have a plan for how your content is going to change.
Note that if you go this route, your cash flow is going to be dependent on the following you create and how much money they can give in a certain period. So it may be difficult if your blog is your only source of revenue.
Have Your Blog Sell Your Main Business
Lastly, and arguably the simplest option on this list, is having a blog that gives you the opportunity to sell your main business.
On paper, this sounds pretty easy. Write your blogs, then plug your other content at the end, right? Not necessarily.
Readers aren’t going to go to a company’s blog to be sold to. If they wanted to purchase, they would likely be headed straight to your product pages. If you write your blogs like your sales pages, people are going to be turned off and leave.
So, what are these readers looking for? Most of the time, they have some sort of informational query that they want a blog to solve. Where a business’s blog comes in is providing that information, and building trust with a reader while doing so. Take a look at online used car seller Carvana’s blog:
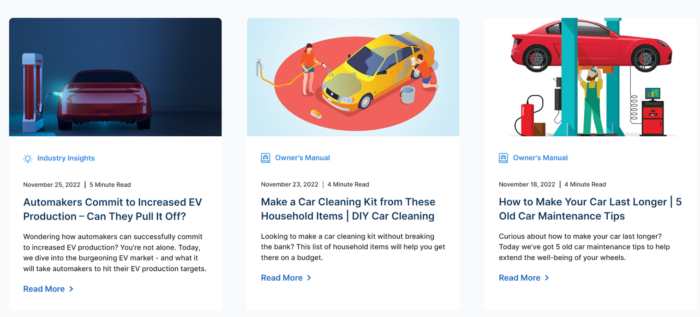
All of these topics are relevant to car owners or people thinking about buying a car. Over time, a follower of this blog may read several topics and grow to trust Carvana. When the time comes for them to buy a used car, Carvana is already top of mind, and they can move to a sale through CTAs on the blogs.
These same principles can apply to your business.
FAQs
How do I create a successful blog?
The first step in creating a successful blog is picking a niche topic for your blog. Do market research and see what other blogs are already out there; you don’t want your blog to cover an area that is already dense with similar blogs. Also, try to pick a topic that has natural ties to money-making blog techniques, like a partnership or sponsored posts, or affiliate links. Then set up a CMS (like WordPress), choose a design, write and publish your first post, and stick to a regular publishing schedule.
What are some options for CMS to use on a blog?
WordPress, Wix, Shopify (for e-commerce sites). When looking for a CMS, be sure they offer usability, flexible digital marketing tools, cross-channel publishing, extensibility, and integrations.
How do I choose a name for my blog?
Use free name generator tools, check for available domains, check business records and social media to make sure others don’t have that name already.
How do I optimize my blog for search engines (SEO)?
Use a reputable SEO plugin if you’re on WordPress like Yoast, set up Google Search Console and Bing Webmaster Tools, make sure your XML sitemap is set up properly (Yoast can do this automatically), and set up permalinks.
How do I come up with blog post topics?
Ask yourself:
- What excites my readers?
- What are common challenges for my readers?
- What are the character traits of my readers?
- What do readers love about my niche?
- What do readers hate about my niche?
How do I monetize my blog?
Through affiliate sales, ad revenue, product sales, and courses.
How much do successful bloggers make?
As of 2020, successful bloggers can make up to 7 figures per year. But that’s only the very top bloggers in successful and popular industries, like marketing or parenting.
How long can I expect it to take for my blog to start making money?
Your blog may be able to earn money in as little as six months from when you start it. This will depend on your ability to incorporate SEO, using affiliate links, and writing about popular topics.
Conclusion
Starting a blog is easy. But creating a successful blog that makes money takes hard work and dedication.
Have some patience as you begin your blogging journey. You can’t expect to make hundreds or thousands of dollars overnight.
Fortunately, running a blog is affordable and it won’t be long before you break even.
If you follow my steps, tips, and best practices for success you can make more than $3,000 per month from your blog in no time.
Everything that you need to get started is here. You can begin right now by getting your free domain and web hosting at Bluehost in just minutes.
As you begin your blogging journey, remember that you’re speaking to humans.
Be you. Be adventurous. Be honest and transparent.
As you continue to consistently create great content, your tribe will flock to you, listen, and convert.
Have you started your blog yet? What is holding you back?